Cilantro Thai Garlic Chicken

I have been wanting to share this recipe for so long and finally got a chance to sit down and do it! I love cooking different kinds of chicken because just plain chicken can get rather boring...and fast! The key to making healthy choices on a long-term basis is to change up your recipes and NOT get bored of your repetitive meals! And let's face it, long lasting and consistent changes are the only ones that make a true, positive impact on our health and overall well-being. Which is why I created this Cilantro Thai Garlic Chicken recipe that is so easy to make and helps your chicken stay flavorful, moist, and most importantly, healthy! This is a sure way to get all the nutrients you need while not getting bored of eating plain grilled chicken day in and day out. Enjoy!

Here is what you need:

Serves 2:

4-5 chicken tenders

1 tsp coconut aminos (great soy-free, gluten-free alternative to soy sauce! I found mine at Whole Foods)

1 T olive oil

1/2 cup fresh cilantro

2 cloves garlic

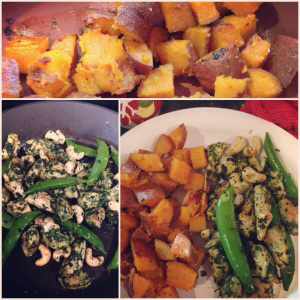
Optional: sugar snap peas, broccoli, toasted cashews

Place the olive oil, coconut aminos, garlic, and cilantro in the food processor and pulse until it forms a paste. Marinate the chicken in the cilantro mixture for about 20-30 minutes! Then cook on the grill, and enjoy! How easy is that!  I love adding some sugar snap peas or broccoli for some extra veggie goodness! As a fun, crunchy option, I toast a few cashews and mix it with the cooked chicken to add a little healthy fat and crunch to this dish! This meal goes great with some sweet potatoes or even a side salad.

Tabbouleh & Soujoukh

This meal is one of my all-time favorites, which is why I am so excited to be posting it today! My mom and I made this last night for dinner and it totally hits the spot when you want something delicious, nutritious, and light, yet filling! Let's start with the yummy tabbouleh recipe :) 

Makes about 4-6 servings:

2-3 bunches parsley

1.5 cups diced tomatoes

3 stems green onions, chopped

1/4 cup fine bulgar wheat (or quinoa if you are gluten intolerance...or you can omit the grain all together to make it grain free, paleo, whole30, etc...I've tried this salad all 3 ways and it tastes delicious each time!)

1/4 cup olive oil

1/4-1/3 cup lemon juice

1/2 t salt

1/4 t red pepper

Pinch of black pepper

Pinch of all spice


Chop the parsley and place in food processor. Pulse until the parsley is minced. Place parsley in a bowl along with the chopped green onions and tomatoes. I usually pour the bulgar on top of the tomatoes at this point and let the juice from the tomatoes soften up the bulgar for about 5-10 minutes. While you wait for this to happen, you can season and start cooking the soujoukh (or Armenian sausage).


Makes 15-18 patties

1 lb ground beef (we used 96/4 from Trader Joe's, but make sure that when you use a meat this lean, you add some olive oil to the pan before grilling the sausage patties!)

1/2 t cinnamon

1 t cloves

1 t cumin

1 t all spice

1 t salt

1 t black pepper

1 t red pepper

2-3 cloves garlic

Mix all the seasonings in with the meat and form little sausage patties. Heat a skillet with 1 T olive oil and start grilling! These sausages cook up pretty fast so be sure to watch them!

While the sausages are cooking, you can mix in the seasonings, olive oil, and lemon juice into the tabbouleh salad. You can eat this tabbouleh on its own, with pita bread, or with lettuce leaves, which is how we did it last night!

 nce the sausages are done, your meal is ready to go!


There you have it! One of my favorite dinners EVER. The leftovers taste amazing too! The tabbouleh gets better the next day, and you can always use to leftover sausages in an omelet or rice bowl with some steamed veggies! Hope you all enjoy this meal!

Chicken & Sweet Potato Casserole

My mom used to make this dish at least once a week while I was growing up. I absolutely love the flavors, seasonings, and even the scent of this dish baking in the oven. We made it again a couple of days ago, but this time, I used sweet potatoes instead of our usual white potatoes. Once I discovered sweet potatoes a few years ago, I have rarely turned back to white potatoes! Here is our Chicken & Sweet Potato Casserole recipe that is gluten-free as well as Whole 30 and paleo approved! I am sure you will love it just as much as I do! Makes 6 servings (or enough for a 9x13 inch casserole dish)

3 sweet potatoes, sliced into 1/4 inch disks

1 T olive oil

1.5-2 lbs boneless, skinless chicken breast

2 T tomato paste

3 cloves garlic

1/2 t salt

1/2 t red pepper

2 T olive oil

1/4 cup lemon juice

1 green bell pepper

Preheat the oven on 450 degrees. Heat a skillet over medium heat on the stove with 1 T olive oil. Wash the sweet potatoes and cut them into about 1/4 inch disks. Brown the potatoes on the skillet for 5-10 minutes to start the cooking process. This helps the potatoes cook faster in the oven and helps them stay moist and not dry out.

While the sweet potatoes are cooking, marinate the chicken breasts with the olive oil, tomato paste, salt, pepper, lemon juice, and garlic in a bowl. Leave some of the marinade in the bowl and evenly place the chicken breasts in a 9 x 13 inch casserole dish. Place the semi-cooked sweet potatoes in the rest of the marinade and coat evenly. Place the sweet potatoes disks over the chicken. Lastly, wash and slice the green bell pepper and place these slices over the potatoes.

Cover the dish in foil and bake the casserole in the oven for 45 minutes, or until the potatoes are tender and the chicken is cooked evenly.


And here is the finished product! You can eat this meal on its own, with a side salad, or with some brown rice. This dish goes a long way and also makes the perfect leftovers! Enjoy! :)

Mama's Chili Recipe!

Yesterday evening, I decided to ring in the first rainy day of fall with my family's famous chili recipe! My mom has been making this chili recipe for years and it is a hit every single time. This is a gluten/grain free recipe, and you can easily make it paleo by omitting the kidney beans and adding extra vegetables such as zucchini, squash, or even more bell peppers! This dish tastes great, is healthy, and leaves the house smelling amazing afterwards! Here is my Mama's Chili recipe!  

Makes 4 servings

1 T olive oil

1 medium onion, chopped

1 green bell pepper, chopped

1 lb lean ground beef (we used 96/4 from Trader Joe's)

1 cup kidney beans, canned and rinsed

1 can fire roasted diced tomatoes, or diced tomatoes with green chiles

2 T tomato paste mixed with 1/2 a cup of water

2 t chili powder

1/2 t salt

1 t cumin

Start by heating the olive oil over medium heat in a large pot. Chop up the onion and pepper and saute in the oil for about 5 minutes until they are browned and softened. Add the ground beef and cook thoroughly! Make sure you grind up the beef into as little pieces as possible to ensure it cooks well. Once the meat is cooked, add the tomatoes and beans. These are the brands we used! But you can definitely use whichever ones you love!

Once you add these, make a tomato "sauce" by mixing 2 T tomato paste with about 1/2 a cup of water. Add this to the pot as well.

Add the remaining seasonings (chili powder, salt, and cumin) and mix all the ingredients together. Set the burner on medium-low heat and let the chili simmer for about one hour, stirring occasionally. Add some water if the mixture becomes too thick!


And here is the finished product! This was such a comforting bowl of goodness on our rainy night last night and is definitely on our menu almost weekly during the fall and winter seasons! I hope you all enjoy! Here is the nutrition info in case anyone is wondering :)


Serving size is 1/4 of the pot, or about 1.5 cups: 250 calories, 8g fat (only 2g saturated fat, the rest is from the healthy olive oil!), 17g carbs, 26g protein

Zucchini Stew

Last night, my mom and I cooked one of my all-time favorite comfort foods. My family makes an amazing zucchini stew that is usually served over rice, but since adopting a more grain-free diet, I've eaten it just by its lonesome without the rice, and have never looked back! I don't even miss the rice because the zucchini, beef, and tomato sauce give so much flavor to this dish that is still tastes delicious even on its own. It is the perfect bowl of comforting nutrients, which is why I put it on the menu for last night! I wanted to make a meal that was warm, nourishing, and that would make enough for leftovers for me to take to my first day of work today! This meal was just that!

Adjustments.jpeg

Zucchini Stew (makes 6 servings)

2 T olive oil

1 cup diced onions

1 lb ground beef (we used the grass fed 85/15 from Trader Joe's)

6 medium-sized zucchini

1 15 oz diced tomatoes

3 T tomato paste

1 t salt

1/2 t red pepper

1/2 t black pepper

1/2 t all spice


Start by heating up the olive oil in a large pot over medium heat. Add the onions and sauté until the onions are tender and translucent. Add the ground beef and chop it up into tiny pieces until it is cooked through.

While the beef is cooking, wash and slice up your zucchini into thin disks!

Once the meat is cooked all the way through, add the zucchini, diced tomatoes, tomato paste, and seasonings! Mix all the ingredients together, then leave the pot over medium heat, covered, for about 1 hour, stirring every 10-15 minutes. There should be enough liquid in the pot since zucchini release a lot of moisture, but if the mixture ever gets dry, add a bit of water to it!

Once the zucchini cooks through and gets mushy, the dish is done! It should resemble a stew-like consistency.

We thoroughly enjoyed this meal last night; my parents added rice to theirs, but I enjoyed the stew as is! I hope you all get to try this dish this winter; it's perfect for cold and cozy nights! Not to mention it is gluten/grain free, paleo, and Whole 30 approved!

Broccoli Chicken & Cheese Casserole (lite!)

Well, it's Monday morning again, which means my Sunday was full of Super Bowl fun and some night time meal prep! I was pretty exhausted after coming home from my Super Bowl party, so I wanted to whip up a quick and easy dish that I could take to work with me for a few days. I made a very easy and low maintenance version of Creamy Broccoli Chicken and Cheese, without the cream! I never liked creamy dishes growing up, but I do love cheese so I decided to lighten up this usually heavy dish! Here is my recipe for Broccoli Chicken and Cheese Casserole! 

Makes 4 servings:

2 cups raw broccoli

1/2 cup uncooked brown rice (can be omitted if you want, just add extra veggies and chicken!)

1 1/3 cup water

1 container Lemon Pepper Chicken Breast from Trader Joe's (or 12 oz chicken breast any way you like...I just was short on time so used my trusty and yummy TJ's chicken!)

1 cup lite shredded mozzarella cheese (or cheddar if that's your thing, I'm just not a fan!)


Start by steaming the broccoli. I usually just place it in the microwave with a few drops of water on top, but if you have a steamer you can use that as well!

Then, cook the brown rice. I used 1 1/3 cup water for my 1/2 cup of brown rice (remember that brown rice needs a bit more water than white rice!) Bring the water and brown rice to a  boil, then simmer for about 10 minutes.

Add the cooked broccoli to the cooked brown rice, then turn the burner off.

Cook your chicken, then dice it up into little pieces! Add the chicken to the brown rice and broccoli and stir together.

This is where some creativity came into the mix, brought to you by my boyfriend. I added the shredded cheese to the pot, but wanted it to melt evenly throughout the pot. My boyfriend suggested making it into a casserole, which I thought was perfect! I sprayed an 8x8 glass dish and poured the rice, broccoli, chicken, and cheese mixture into it, making sure the cheese was evenly distributed. I baked the casserole on 350 degrees for about 10 minutes, just enough for the cheese to melt. You could also wait till the end to add the cheese and sprinkle it on top of the casserole before placing it in the oven to get the cheese to brown up on top! I just wanted it to melt, which ended up looking like this!

And there you go! This meal is perfect to cut up into squares and take to work or school!

I paired my meal with a nice salad filled with veggies and some olive oil dressing. This was SUCH a quick and easy recipe, filled with protein, fiber, and tons of vitamins, which will leave you feeling great. Hope you all enjoy!


Nutrition facts: 1/4 of recipe

235 calories, 6g fat, 20g carbs, 26g protein, 25% DV Vitamin A, 65% DV Vitamin C, 22% DV Calcium!

Mujedereh (Bulgar and Rice)

Happy Monday everyone! I don't know about anyone else, but the time change really hit me hard today! But not until about 10am. I still woke up at 5am per usual, went to the gym, got ready, headed to work, and felt super energized! Until 10am hit...and then I felt like I just wanted to find the nearest bed and knock out! Thank God I made it through the work day and finally got home! My mom made one of my favorite dishes for dinner tonight, so I thought I'd share it. It's called Mujedereh but it is basically a type of lentil rice, but with bulgar wheat! Bulgar has a ton of fiber and nutrients, and pairing it with the lentils makes this a nutritious and filling meal! You can also substitute the bulgar with rice or quinoa to make this gluten free! I've tried both versions in addition to the original one and all taste incredible! Mujedereh (makes 5-6 servings)

1 cup lentils

1/2 cup bulgar

3 cups low sodiumchicken broth

salt to taste

1 tablespoon olive oil

1/2 cup sliced onions

2 T pine nuts


Start by bringing the chicken broth to a boil. Add the lentils and cook for about 20 minutes, or until the lentils are soft. Then, add the bulgar, cover the pot, and let the lentils and bulgar cook together for another 20 minutes, or until the mixture is mushy and soft. Add salt to taste.

While the lentils and bulgar are cooking, heat up the olive oil in a skillet. Add the sliced onions and pine nuts and sauté until they are browned. Once everything is done, serve up the Mujedereh and top with the sautéed onions and pine nuts!


And that's it! This is a pretty simple recipe that is easy to make and is great for leftovers! Have a great night everyone!

Cajun-style Chicken & Rice

The creation of this recipe was one of those "throw-everything-in-the-pot-and-hope-it's-delicious" type of experiences...and I was definitely NOT disappointed! And the best part...it only took 30 minutes to put together! I was in a huge rush on Monday morning to put together a meal that would last me the week for lunches at work. I usually do my meal prep Sundays, but since I had quite a busy weekend (I got engaged woooo!), I had to scrounge something up on Monday morning. I had bought some of my favorite prepared lemon pepper chicken from Trader Joe's, and definitely wanted to use it in a meal that would not only taste great but would make an easy lunch for the week! This recipe was so simple and delicious, I'm excited for you all to try it! Here is my Cajun-style Chicken & Rice Recipe!

Makes 4 servings:

1 package Lemon pepper chicken (or about 12 oz of cooked chicken)

2 Spicy Jalapeño Chicken sausage links

1/2 cup uncooked brown rice

1 1/4 cup water

1 cup broccoli

1/2 cup chopped bell pepper

1/2 cup sugar snap peas

1 T olive oil

1-2 t cajun seasoning (or to taste)

1 t garlic powder

1/2 t salt


Start by cooking your chicken. The lemon pepper chicken cooks easily in the microwave, just follow the instructions on the package! Once your chicken and sausage is cooked up, chop them up. Meanwhile, sauté the snap peas and peppers with the olive oil over medium heat. I steamed my broccoli. While you are cooking your veggies, cook the brown rice according to the instructions. I used 1/2 cup dry rice with 1 1/4 cups water. Once the rice is cooked, add the veggies to the pot!

Add the sausage and chicken to the pot as well.

Once all the ingredients are mixed up, you can add the cajun seasoning, garlic powder, and salt. I used the Cajun seasoning from Whole Foods that my cousin bought me...it's my favorite!

Mix the seasonings throughly, and then you are done! The smell of this meal was so amazing!

This recipe provides the perfect mix of nutrients: protein, healthy carbohydrate, veggies, fiber, vitamins, minerals, and healthy fat from the olive oil! Check out the nutrition facts below!

1 serving (about 1 cup): 280 calories, 10g fat, 23 g carbs, 26 g protein, 90% daily need for Vitamin C!

I hope you all get to enjoy this dish soon! It was prepped in 30 minutes, has been making the perfect lunches for my week, is healthy, and most importantly, IT IS DELICIOUS! :)

I wish you all a happy Wednesday!!!

Eggplant and Zucchini Marinara

I thought I would share a recipe I whipped up last night. It's a random combination of foods but came out tasting great! I am calling it Eggplant and Zucchini Marinara with Lentils! I had some eggplant and zucchini in the fridge that I didn't want to go back...plus half a jar of marinara sauce. So I got working in my kitchen!

First, I chopped up my eggplant and a bag of mini zucchinis I got from Trader Joe's...if you have normal sized zucchini, you would only need about 3-4! After chopping them up, I steamed them on my stovetop. While the veggies steamed, I boiled 2/3 cup of green lentils in some water for about 25-30 minutes until they softened up!

Once the veggies were done steaming, I poured out all the water from underneath the steamer, then used to same pot (what can I say, I am a minimalist) to put the steamed veggies in. Then I mixed in half the jar of marinara sauce. Once the lentils were done, I drained the water and added them as well!


This dish turned out so warm, delicious, and filling! It's so easy and quick and is perfect to make in bulk to take to school or work with you!