Sourdough crust (multi-purpose!)

I have been baking with sourdough for a while now, and while I’ve tried many pizza crusts, I haven’t found one that I’ve loved until this one! I made this recipe after a bunch of experiments and I can honestly say it was a hit! I made it into an herb flatbread, but it can be used for pizza as well! It’s delicious and I hope you all enjoy!

Ingredients:

60 g sourdough starter

230 g water

250 g bread flour

90 g whole wheat flour

7 g salt

1 T olive oil

1/4 tsp each of garlic and onion powder

Sprinkle of oregano

Mix all the ingredients together until it becomes a shaggy dough. Cover with a towel and let sit at room temperature for about 1 hour.

After the hour, do 4 sets of “stretch and folds,” basically taking the dough from one corner of the bowl and folding it over, then turning the bowl and doing it over again. Do about 25 stretch and folds, then cover again for 25 minutes. Repeat every 25 minutes until you’ve done 4 total, then let over the bowl with plastic wrap and a towel, and let the dough rise at room temperature overnight. (If you want to know more about the stretch and fold method, as well as sourdough in general, I highly recommend my video class and PDF guide that you can purchase HERE!)

You can either use the dough the next day, or put it in the fridge after the overnight rise for later use! I used my dough two days later to make this herb bread for our breakfast! It was incredible, chewy, flavorful, and just what you want a pizza crust to be!

When you’re ready, take out your dough and preheat the oven to 425. Spread the dough out with your desired toppings. Then bake on 425 F for 20-22 minutes and enjoy!!


Tortellini Soup (instant pot)

My almost-4 year old, Emma, has been obsessed with soup lately. Whether it’s my lentil soup, yogurt soup, beef stew, or this newest tortellini soup, every day when she comes home from school, she wants soup! I don’t mind because I can load em up with veggies and nourishing foods and they are like a hug in a bowl. Here is a delicious tortellini soup I created a couple weeks back, and we all couldn’t get enough of it!

IMG_9699.jpeg

Makes 6-8 servings

2 T olive oil

1 onion, chopped

2 cloves garlic, crushed

2 cans diced tomatoes, Italian style or fire roasted for a bit of spice

4 cups chicken broth

1 tsp salt

1/2 tsp black pepper

2 tsp Italian seasoning

8 oz dried tortellini

1 cup frozen spinach, chopped

Start by putting your instant pot on the saute function, and heating up the olive oil. Add the chopped onions and garlic and saute until fragrant.

Turn the saute off, then add the rest of the ingredients except for the spinach.

Close the lid and turn the knob to sealing, then cook on manual/pressure cook for 10 minutes. Let naturally release for 5 minutes, then manually release the pressure. Add the frozen spinach until it is heated through, and then serve!

We ate this soup with this crusty homemade bread and it was delicious!

Enchilada Casserole

To go along with my homemade enchilada sauce, we made the most delicious enchilada casserole! My husband and kiddos gobbled it up and it was so tasty, even the next day as leftovers!! It’s pretty easy to throw together and makes for a great warm comfort food during the winter! Here’s the recipe!

F61AEA6A-087B-4930-9B09-594D27D950B8.PNG

Makes 12 servings

2 cups enchilada sauce (try my homemade one if you want!)

8-10 flour tortillas

2 cups shredded chicken (you can use a store bought rotisserie too…easy peasy!)

2 cups shredded Mexican cheese blend

1 cup frozen chopped spinach (optional)

Spray or grease a 9x13 casserole dish and preheat the oven to 400 degrees F.

Pour some enchilada sauce on the bottom of the dish and spread evenly.

Place flour tortillas on top of the sauce, then shredded chicken, then more enchilada sauce, then cheese, then sprinkle on the frozen spinach (we love doing this as a way to infuse more greens in our meals!) Repeat this pattern of layering and make sure the top layer is cheese!

Bake covered with foil for 30 minutes, then uncover and bake for another 10-15 minutes till the cheese is bubble/melty. We also broiled it at the end for 3-4 minutes to get it a little crispy on top!

Let it rest for about 10 minutes, then cut into it and enjoy with a side salad, rice and beans, or on its own!

Turkey & Veggie Meatloaf

My kids devoured this and there are so many veggies in it, which made my dietitian-mommy heart happy! It also holds up amazingly as leftovers! 

IMG_1055.JPG

Makes 1 meatloaf 

1 small onion chopped 

3 mini bell peppers chopped 

1 cup cauliflower rice 

1 carrot grated 

1 zucchini grated 

1 T olive oil 

1 lb ground turkey 

1/2 cup almond flour 

1 egg

1/2 tsp thyme & oregano 

1 tsp salt 

1 tsp garlic powder 

1/2 tsp black pepper 


Sauté the vegetables with the 1 tablespoon of olive oil until soft. Then let the veggies cool for about 10 mins.

Once the veggies cool off, mix th em with the turkey, egg, almond flour, and spices. Spray a bread loaf pan and pour the meat mixture into it. 

Bake on 400 F for about 50-60 mins or until the internal temperature reaches 165 F.

Enjoy with a side of rice and/or salad! 

Chicken, Broccoli, & Cheese Casserole

This is a dish that both my mom and mother-in-law have made since my husband and I were little kids. It is definitely on the heavier side, but it is delicious and so satisfying! The traditional recipe uses Campbell’s cream of mushroom and cream of chicken soups, but both of those contain gluten. I found an organic gluten-free brand at Sprouts and I’ve been so excited to make this recipe again!! It’s hands-down my husband’s favorite dish and I hope you all enjoy it as much as we do !

public.jpeg

Ingredients:

2 cups broccoli florets

2 cups shredded chicken

1 carton/can cream of mushroom soup

1 carton/can cream of chicken soup

2 T lemon juice

1-1.5 cups shredded Mexican cheese blend

Preheat your oven to 400 degrees F. Spray or grease a 9x13 casserole dish. Then layer the broccoli and the chicken.

In a separate bowl, mix the two cream soups with the lemon juice until thoroughly mixed, then pour over the broccoli & chicken in the casserole dish.

public.jpeg
public.jpeg
public.jpeg

These are the soups I found at Sprouts and they were delicious!

public.jpeg

Then lastly, add the shredded cheese on top!

public.jpeg

Cover with foil and bake for about 35-40 minutes. Then uncover and broil for a few more minutes until the cheese gets slightly brown and crispy. You can eat this on its own or serve with rice! Hope you all enjoy!

public.jpeg

Sweet Potato Hash

Who else is obsessed with sweet taters??!! I go through so many a week and usually just roast them. But this week, I decided to whip up a hash and it turned out SO GOOD! Here is the recipe!

3 sweet potatoes

1 small red onion (or half of a big onion)

2 T olive oil

1/2 tsp garlic powder

1/4 tsp paprika

1/4 tsp salt

public.jpeg

Start by chopping the sweet potatoes into 1/2 inch cubes. Place them in a microwave safe bowl with a wet paper towel on top and cook them for about 10 minutes in the microwave, stirring every 3 minutes. You could also par boil the sweet potatoes and get them soft but not entirely cooked yet instead of microwaving.

While the potatoes are in the microwave, mince the red onion. Heat up the olive oil in a skillet and put the red onion in there and sauté until translucent. Then add the microwaved sweet potatoes, garlic powder, paprika, and salt, and sauté on medium high heat so the outside of the potatoes get crispy. Continue cooking until the potatoes are crispy on the outside and soft on the inside.

public.jpeg

Then, enjoy with your favorite meal! I served them up with some beef sausage patties for lunch, and then reheated them to have with breakfast the next day! They are a great meal prep option too to make in bulk for your week. I hope you guys enjoy this recipe and tag me in your creations (IG: @tveenverano.rd) if you make it so I can see!

Cheddar & Bacon Monkey Bread Muffins

This recipe...was SO good. I wanted to post it up soon because it would make a great side dish to your Thanksgiving feast! Biscuit dough has always been a favorite of mine growing up, and the savory additions to this muffin made it so tasty!

I would just like to preface that this isn’t the most nourishing food, BUT it is part of MY food freedom that I’ve been experiencing, and definitely made for a tasty treat! This blog has healthy, wholesome recipes, and treat recipes, and I’ve come to a place where having foods like this doesn’t bother me or send me over the edge anymore. We have to learn how to nourish ourselves well so that we can enjoy the treats as well and not be so stressed around foo! I am so thankful for the food freedom and nourishment that I’ve been experiencing in this journey, and know that I am here to guide you through it as well, just reach out and we can chat! 


Anyways, onto zee recipe!  

FullSizeRender.jpg

These were super easy to whip up, and turned out so savory and delicious! I made a big batch since my hubby took them to work with him, but you could definitely cut the recipe down if need be!  


Cheddar & Bacon Monkey Bread Muffins

(makes 30-ish muffins) 


3 cans refrigerated biscuit dough

3 cups shredded cheddar-jack cheese mix

8-10 slices turkey bacon

1.5 tsp garlic powder

0.5 tsp onion powder

0.5 tsp sage

1.5 tsp thyme

0.25 tsp salt, or to taste  

1/2 cup butter, melted


Preheat the oven to 350 degrees. Then line a muffin tin with liners or parchment paper.  

First, chop the turkey bacon and fry them in a pan until they are crispy. Set aside to cool.

Then, open up the biscuits and cut into little cubes.  

IMAGE.JPG

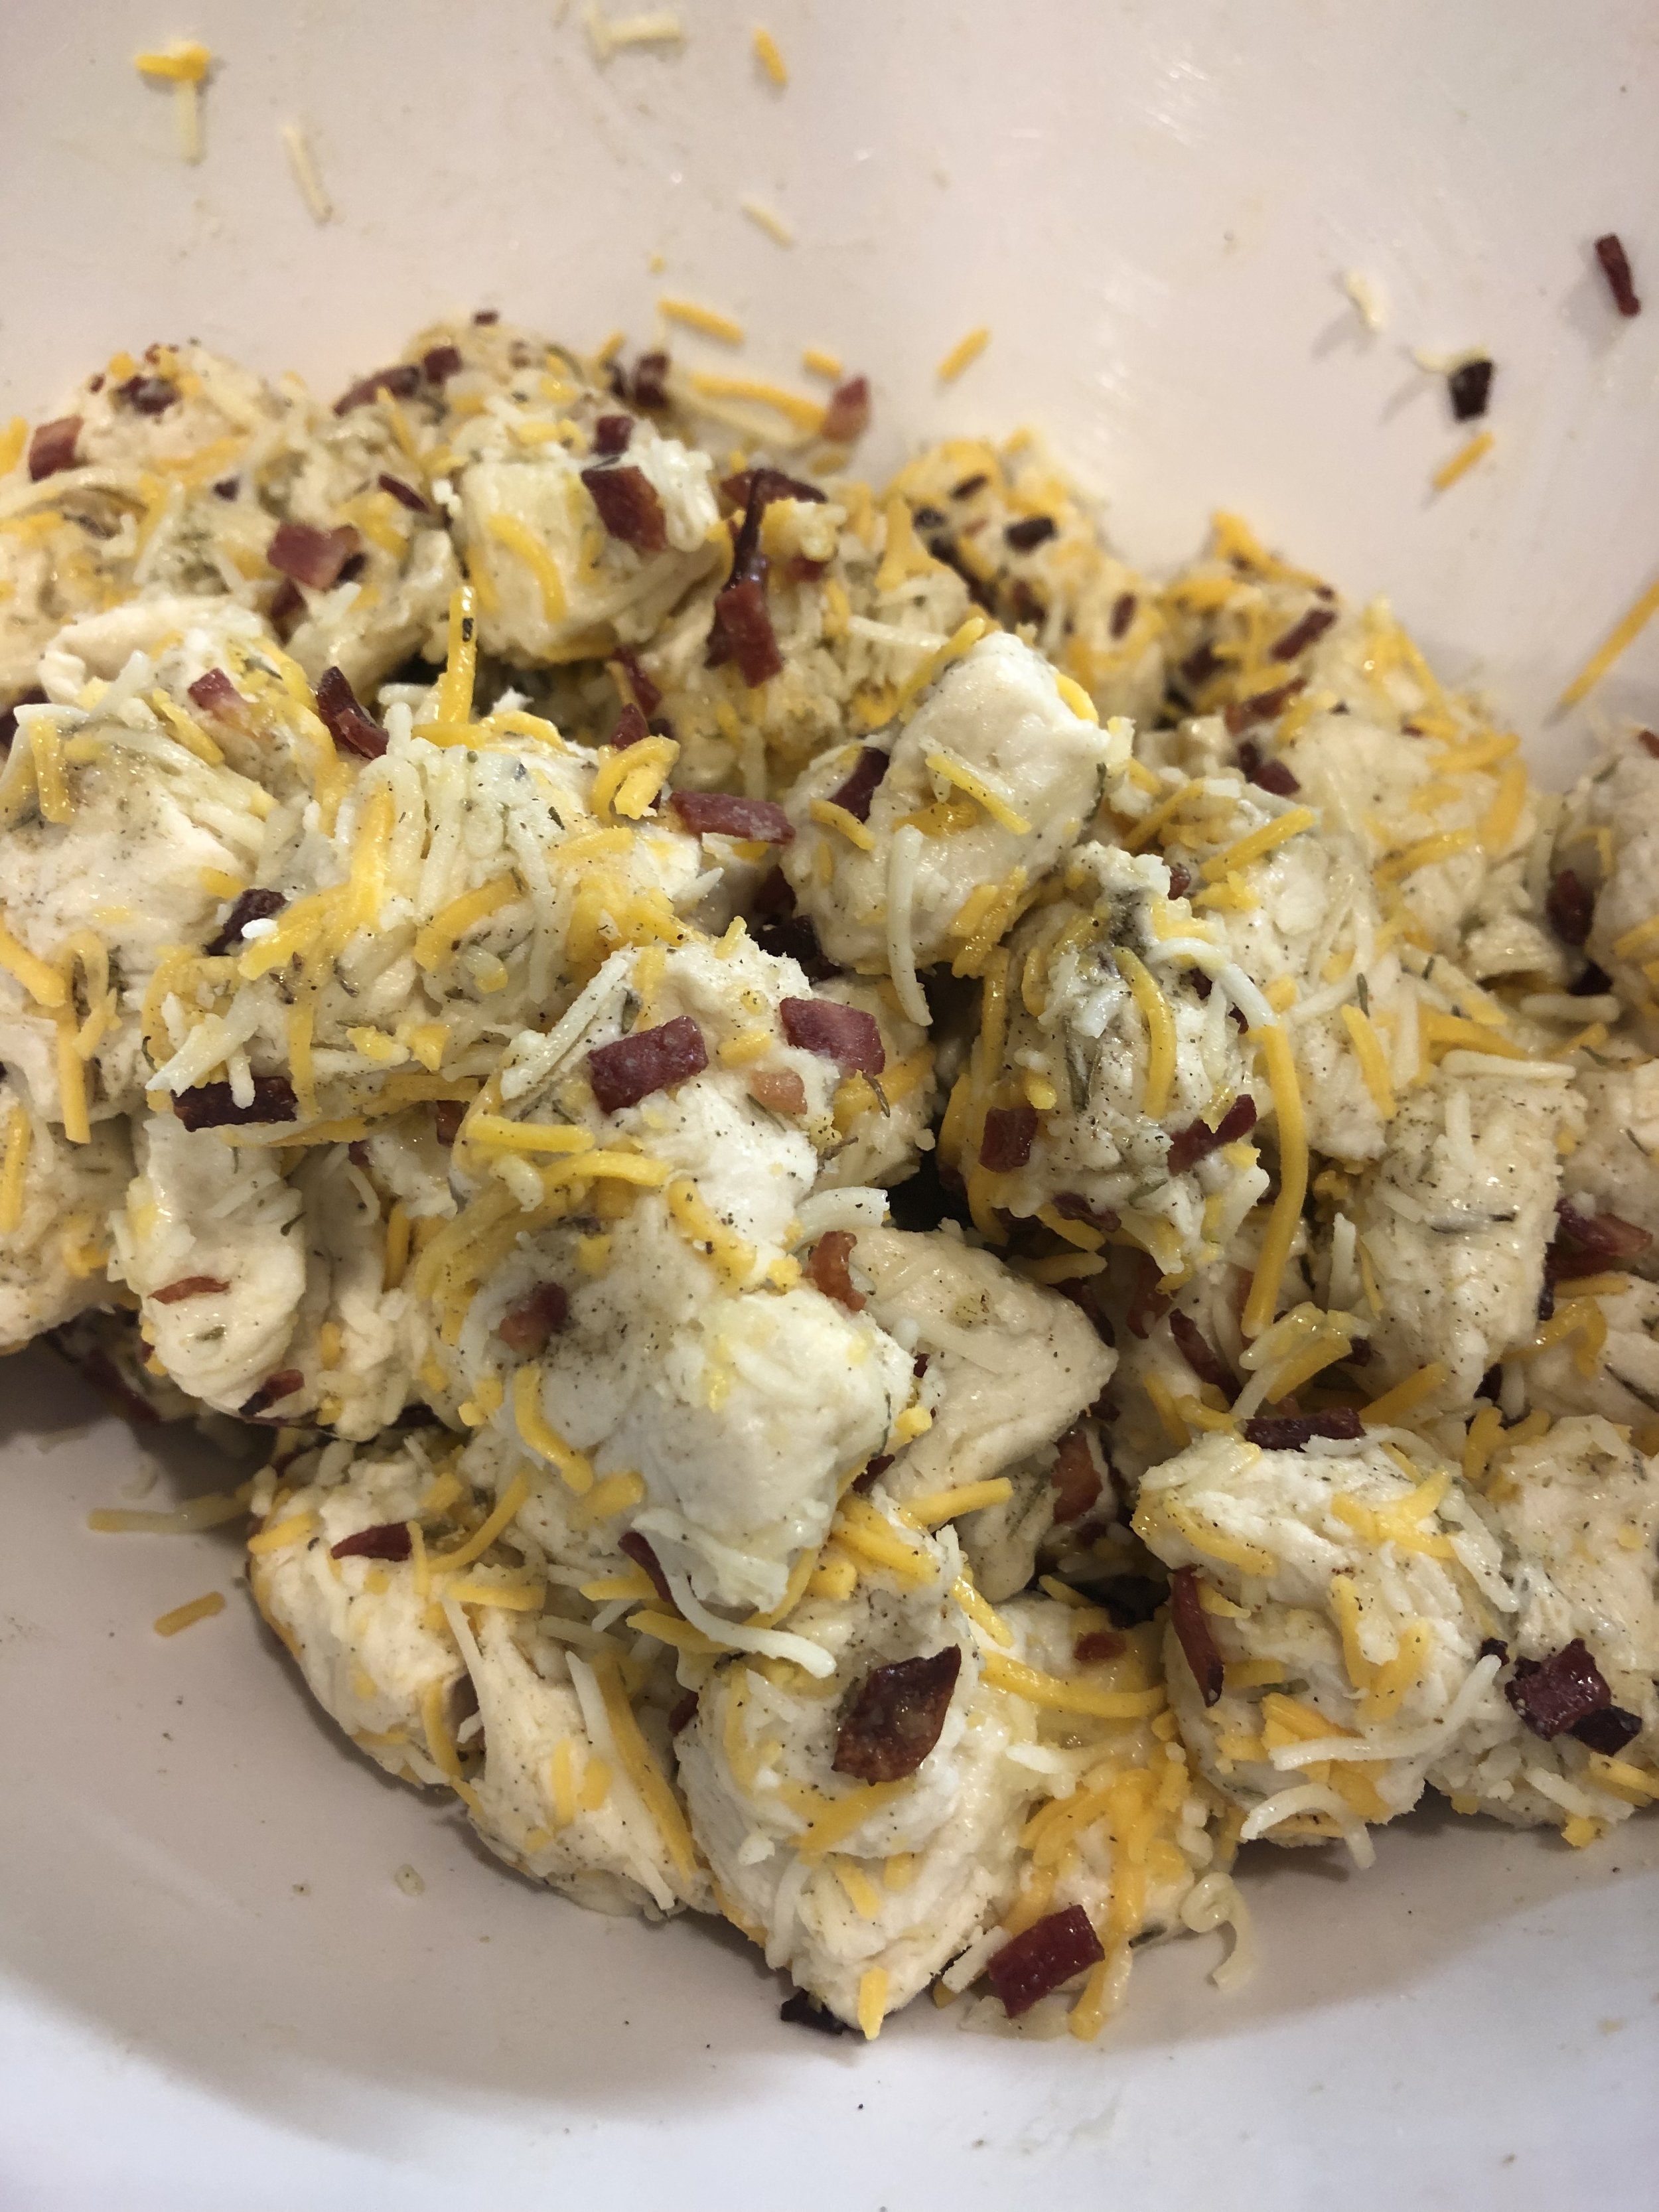
Place them in a large mixing bowl, then mix in the cheese, bacon, melted butter, and spices. Toss until the biscuits are evenly coated with all the yummy add-ins!  

IMAGE.JPG

Place about 5-6 cubes of the biscuits in each muffin tin. Then bake for 15-18 minutes or until the tops are golden brown.  

IMAGE.JPG

These were so gooey and delicious fresh out of the oven, but tasted great with breakfast this morning too!!  

Hope y’all enjoy and Happy early Thanksgiving!  

Shredded BBQ chicken (Instant Pot!)

I have been singing the praises of the instant pot ever since my hubby got it for me for Christmas. It has literally transformed meal prep, helped us eat out WAY less, and makes cooking at home so much easier! I’ve been making shredded chicken almost weekly, so I wanted to share a super easy rendition with you all! 

IMG_4029.PNG

Shredded chicken is so versatile! I’ve been making it with salsa verde, but also adding BBQ sauce to it as well, which means you can add it to salads, wraps, sandwiches, or just eat it plain!

And the best part is that you can use frozen chicken, make it taste super moist and fresh, and you don’t have to defrost the day before and make sure you plan ahead! You can just straight up throw frozen chicken into the instant pot and have a meal ready in less than 30 minutes. Here’s the super easy recipe! 


Makes 6-8 servings  

8 frozen chicken tenderloins

2-3 frozen chicken thighs  

1 cup chicken broth  

1 cup bbq sauce of choice  


Place the frozen chicken into the IP, along with the broth. Cover and set to sealing, then cook on manual for 22 minutes. Let the pressure release naturally for about 10 mins; then quick release.  

Once the pressure releases, take the chicken out of the IP and place in a bowl. Shred the chicken with two forks, then add the BBQ sauce and mix thoroughly! 

And that’s it! Super easy to throw together and it tastes delicious! Hope y’all get to try this recipe and seriously, if you don’t have an instant pot, go get one TODAY! They are life changing!  

Easy Roasted Vegetables

IMG_2363.PNG

If there's one thing that I always like to have on hand are ready to eat vegetables. I typically love raw vegetables, but there is something so comforting about roasted and warm veggies during the winter time (even though our weather here has been far from winter weather, but I digress).

I decided to roast up some vegetables on Tuesday to eat with some turkey marinara I whipped up. I boiled whole wheat noodles for Emma, my hubby, and a dear friend from church who came over for dinner! Since I'm gluten free, but don't really like a lot of gluten free noodles out there, I thought I'd try the marinara over roasted vegetables, and it turned out SO GOOD! Here is the recipe for a quick and simple roasted veggies pan that you could use as a side to any meal...breakfast, lunch, or dinner!

Easy Roasted Vegetables

1 package butternut squash (I used the Trader Joe's precut one and chopped it up even smaller)

2 cups Brussels sprouts, halved

2 zucchinis, chopped*

3 tablespoons olive oil

1 tablespoon balsamic vinegar

1/2 tablespoon dried basil

1/2 tablespoon garlic powder

salt and pepper to taste

*And really, you could add any vegetables to this! Bell peppers, onions, eggplant, the stage is yours!


1. Preheat the oven to 400 degrees.

2. Chop up all your vegetables and place on greased baking sheet.

3. Mix the oil, vinegar, and spices separately, then pour over the vegetables and toss until they are all evenly coated.

4. Bake for 25-30 minutes until the veggies are crisp and starting to brown.

5. Enjoy!

See? Super simple and now you have zero excuses as to why you can't eat your vegetables! :)